Show All Actions
With this option all test actions can be combined and used together to create complex scenarios. It allows Android system to changeover between different applications. Thus, forcing both device's and Android Operating System's features is possible concurrently.
- FINISH Test: Finishes the test anytime desired. The test result is recorded as succesful.
- FAIL and FINISH Test: Fails and finishes the test anytime desired. The test result is recorded as fail.
- GO TO Label: This action is used to make jumps to the step entered in Parameter (1) during test scenarios. Every step in the scenario can be labeled.
- Print This Text to Log File: It is used to add a text to the log file during the test. The text entered in Parameter (1), will be written to the log file on its turn.
- Set ALARM Volume Percentage: Sets Alarm Volume Percentage to the value entered in the Parameter (1). There is no Time Out period.
- Set DTMF Volume Percentage: Sets DTMF Volume Percentage to the value entered in the Parameter (1). DTMF is the sound of the keys on call screen keypad. There is no Time Out period.
- Set RING Volume Percentage: Sets Ring Volume Percantege heard during an incoming call to the value entered in the Parameter (1). There is no Time Out period.
- Set NOTIFICATION Volume Percentage: Sets Notification Volume Percentage to the value entered in the Parameter (1). All Sms / Mms and Application Notification sounds are in this category. There is no Time Out period.
- Set MUSIC Volume Percentage: Sets Music and Video Volume Percentage to the value entered in the Parameter (1). There is no Time Out period.
- Set SYSTEM Volume Percentage: System Volume describes the sound regarding low battery alert and the opening / closing notifications of audio devices. Sets System Volume Percantege to the value entered in the Parameter (1). There is no Time Out period.
- Set VOICE_CALL Volume Percentage: Sets the volume percentage received during phone calls to the value entered in the Parameter (1). Volume level of the talks can affect battery consumption. There is no Time Out period.
- Print Battery Info: Prints the Battery Status Info to the log file. No parameters required.
- Print CPU Info: Prints the CPU Usage Info to the log file. No parameters required.
- Print GPU Info: Prints the GPU Usage Info to the log file. No parameters required.
- Print Memory Info: Prints the Memory Usage Info to the log file. No parameters required.
- Set COUNTER_ONE: Assigns the value entered in Parameter (1) to the counter. Used to create a loop starting from this step. There is no time out period for this action.
- Decrement COUNTER_ONE: To create a finite loop, decreases the value assigned to Counter_One by the value entered in Parameter (1). There is no time out period for this action. Generally used together with the action "If Counter_One is>=... GO TO Label..."
- Increment COUNTER_ONE: To create a finite loop, increases the value assigned to Counter_One by the value entered in Parameter (1). There is no time out period for this action. Generally used together with the action "If Counter_One is<=... GO TO Label..."
- If Counter_One is>=... GO TO Label...: After the value given in Counter_One is decreased, this action checks the new value. If the new value is bigger than or equal to the value entered in Parameter (1), the loop continues. When the value is less than the value entered in Parameter (1) the loop ends.
- If Counter_One is<=... GO TO Label...: After the value given in Counter_One is increased, this action checks the new value. If the new value is less than or equal to the value entered in Parameter (1), the loop continues. When the value is bigger than the value entered in Parameter (1), the loop ends.
- Set Counter_2: Assigns the value entered in Parameter (1) to the counter. Used to create a loop starting from this step. There is no timeout period for this action.
- Decrement Counter_2: To create a finite loop, decreases the value assigned to Counter_2 by the value entered in Parameter (1). There is no time out period for this action. Generally used together with the action "If Counter_2 is>=... GO TO Label..."
- Increment Counter_2: To create a finite loop, increases the value assigned to Counter_2 by the value entered in Parameter (1). There is no time out period for this action. Generally used together with the action "If Counter_2 is<=... GO TO Label..."
- If Counter_2 is>=... GO TO Label...: After the value given in Counter_2 is decreased, this action checks the new value. If the new value is bigger than or equal to the value entered in Parameter (1), the loop continues. When the value is less than the value entered in Parameter (1) the loop ends.
- If Counter_2 is<=... GO TO Label...: After the value given in Counter_2 is increased, this action checks the new value. If the new value is less than or equal to the value entered in Parameter (1), the loop continues. When the value is bigger than the value entered in Parameter (1) the loop ends.
- Set Counter_3: Assigns the value entered in Parameter (1) to the counter. Used to create a loop starting from this step. There is no timeout period for this action.
- Decrement Counter_3: To create a finite loop, decreases the value assigned to Counter_3 by the value entered in Parameter (1). There is no time out period for this action. Generally used together with the action "If Counter_3 is>=... GO TO Label..."
- Increment Counter_3: To create a finite loop, increases the value assigned to Counter_3 by the value entered in Parameter (1). There is no time out period for this action. Generally used together with the action "If Counter_3 is<=... GO TO Label..."
- If Counter_3 is>=... GO TO Label...: After the value given in Counter_3 is decreased, this action checks the new value. If the new value is bigger than or equal to the value entered in Parameter (1), the loop continues. When the value is less than the value entered in Parameter (1) the loop ends.
- If Counter_3 is<=... GO TO Label...: After the value given in Counter_3 is increased, this action checks the new value. If the new value is less than or equal to the value entered in Parameter (1), the loop continues. When the value is bigger than the value entered in Parameter (1) the loop ends.
- Set orientation Portrait: Sets the screen rotation to portrtait. All touchscreen devices can be rotated 360 degrees. No parameters required. Default Time Out period is 600 ms unless it is changed.
- Set Orientation Landscape: Sets the screen rotation to landscape with a 90° angle to portrait orientation. This option is generally used while playing games and watching videos. No parameters required. Default Time Out period is 600 ms unless it is changed.
- Set orientation Reverse-Portrait: Sets the screen rotation to reverse-portrait with a 180° angle to portrait orientation. This action is important for stability of the device. No parameters required. Default Time Out period is 600 ms unless it is changed.
- Set orientation Reverse-Landscape: Sets the screen location to reverse-landscape with a 270° angle to portrait orientation. This option is generally used while playing games and watching videos. No parameters required. Default Time Out period is 600 ms unless it is changed.
- Wait EXTRA ... millisecond(s): Waits extra amount of milliseconds entered in Parameter (1), before taking the next step of the test.
- Wait EXTRA ... second(s): Waits extra amount of seconds entered in Parameter (1), before taking the next step of the test.
- Wait EXTRA ... minute(s): Waits extra amount of minutes entered in Parameter (1), before taking the next step of the test.
- Wait EXTRA... hour(s): Waits extra amount of hours entered in Parameter (1), before taking the next step of the test.
- Standby OFF (Display is OFF and LOCKED): This action also activates the keylock while the device is in stanby mode. Thus the device runs with minimum energy. Mobile Devices pass to Standby Off mode approximately in 500 ms This value may change depending on the device, and the default Time Out value is 500 ms unless it is changed.
- Light UP (Display is ON): Sets the display on and brightens the screen. No parameters required. Action must be taken within the entered Time Out period value. Otherwise test fails and ends.
- Standby On (Display Unlock): Standby is the mode where the device runs with less energy. It is ready and waiting with the Keylock inactive. In this mode, device notifications and incoming calls are visable. In such a case, the device temporarily leaves the standby mode. With the proper command, Mobile Devices pass to Stand By mode approximately in 500 ms. This value may change depending on the device, and the default Time Out value is 500 ms unless it is changed.
- Set Brightness Value: This action sets the screen brightness to the value entered in Parameter (1) according to device's rates. If the screen brightness values for the device is 1 to 10, the entered number must be between these.
- Set Brightness Percentage: Sets the screen brightness percentage of the device. The parameter values should be from 0 to 100. Theoretically this value can be set as '0', but practically that is not possible. The minimum level value (starting with 1) may change depending on the device.
- Increment Brightness Percentage: Increases the screen brightness percentage to the value entered in Parameter (1). The entered value is read in %. For example if the entered value in Parameter (1) is 5, the screen brightness will be increased by 5%.
- Decrement Brightness Percentage: Decreases the screen brightness percentage to the value entered in Parameter (1). The entered value is read in %. For example if the entered value in Parameter (1) is 5, the screen brightness will be decreased by 5%.
- Set Background Color AARRGGBB: Sets background color in ARGB format. Each color section must be entered in hexadecimal numbering system. "A" is opaqueness, "R" is redness ratio, "G" is greenery ratio, and "B" is blueness ratio. If the color ratio is 0, that color will not appear on the screen. For example FFFF0000 value is an opaque red. The 11FF0000 is a transparent red. You may need help to write the value from a color scale.
- Enable WIFI: Allows the device to join any Wifi Network. The standard Time Out period for enabling Wifi is 1 second. This value can be changed. If it is set as 500 ms, the device must take the action in 500 ms. If the action is not realized in the defined time, the test fails due to Time Out.
- Disable WIFI: Turns off the device's network connection. With this action, the Wifi connection is disabled and therefore the battery usage is decreased. The standard Time Out for disabling Wifi is 1 second. This value can be changed. If it is set as 500 ms, the device must take the action in 500 ms. If the action is not realized in the defined time, the test fails due to Time Out. The Time Out period is very important during product development and for optimization processes.
- Connect WIFI: Provides connection to a chosen Wifi network. It is necessary to use "Enable Wifi" command before "Connect Wifi" command to start the test. The name of the chosen Wifi Network must be entetred in Parameter (1) and its password must be entered in Parameter (2). The distance of the device to Wifi Modem can effect the connection period. Establishment of connection may take 5 to 20 seconds for mobile devices, and the default Time Out value is 45 seconds unless it is changed.
- Disconnect WIFI: Disconnects the Wifi connection while the device is connected to a Wifi Network. Mobile Devices disconnect from the Wifi Network in around 4 seconds, and the default Time Out value is 4 seconds unless it is changed.
- Remove WIFI: Mobile devices record all recent Wifi Network data. This command removes all the defined data regarding the Wifi Network entered in Parameter (1). The expected action time is 4 seconds, and the default Time Out value is 4 seconds unless it is changed.
- Log WIFI connection INFO: Records the Wifi Connection INFO to log files.
- Download FILE: Downloads the file that's adress is entered in Parameter (1). Time Out period changes, due to file size and network connection quality. Please note that, this action requires internet connection.
- Play Youtube Video: Plays the video whose adress is entered in Parameter (1). Action parameter must be only in Youtube link form and Youtube mobile links can not be used. Copying the link from the browswer and pasting it as parameter is enough. When setting Time Out period, video runtime and Wifi signal quality are important. That is, if the wifi signal gets weaker or disconnects, then video will freeze. So, extra time should be calculated when setting the timeout period.
- Enable WIFI Hotspot: Enables device's Wifi Hotspot to share its mobile connection with the other devices nearby. The default Time Out period is 30 seconds unless it is changed.
- Disable WIFI Hotspot: Disables device's Wifi Hotspot and cuts the connections established with the other devices. The default Time Out period is 10 seconds unless it is changed.
- Enable USB Hotspot: Enables device's USB Hotspot to share its mobile network connection with the other devices via USB cable. The default Time Out period is 30 seconds unless it is changed.
- Disable USB Hotspot: Disables device's USB Hotspot and cuts the connections established with the other devices. The default Time Out period is 10 seconds unless it is changed.
- Enable BLUETOOTH Hotspot: Enables device's Bluetooth Hotspot to share its mobile connection with the other devices nearby. The default Time Out period is 45 seconds unless it is changed.
- Disable BLUETOOTH Hotspot: Disables device's Bluetooth Hotspot and cuts the connections established with the other devices. The default Time Out period is 10 seconds unless it is changed.
- Connect other DEVICE over BLUETOOTH Hotspot: Connects the two devices where the test is sent. Devices consequently pair with each other via bluetooth.
- Connect other DEVICE over WIFI Hotspot: Connects the two devices where the test is sent. Devices consequently pair with each other via Wifi.
- Set Hotspot DOWNLOAD Link: Downloads the file from the link in Parameter(1) to test the connection.
- Set Hotspot WEB Link: Opens the web site from the link in Parameter(1) to test the connection.
- Set Hotspot YOUTUBE Link: Opens the link from the Youtube in Parameter(1) to test the connection.
- Add Application to Monkey Test (com.x.y): This action, which is not a must for Monkey Test, is recommended for testing one or more specific applications and can be used several times. During the test, it runs the specified application in Parameter (1). The added applications interact with each other, and the events will only be sent to these applications. When no applications are added, any action from any package will be used without any restrictions. Do not use this command when running tests like System User Interface tests or Launcher tests. For detailed information: Select Application Page
- Set Duration Between Events (ms): This action defines the waiting time between events. The recommended value is 10 milliseconds. In order to force the device, values 3 to 5 milliseconds can be entered. Values less than 5 milliseconds have an important task of finding out the critical bugs which can not be caught in manual tests. Values defined less than 5 milliseconds can cause overheating and failures. The expectation is to run the system without any failures, even when the duration between the events is set as 5 milliseconds. Therefore, this action is highly critical.
- Inject ... Events: Defines the number of events that will be used in Monkey Test and injects these events to the test. Desired number of events must entered in Parameter (1). If event percentages (for any number of actions marked with (*)) will be set manually, then they should be entered before this command. Otherwise the command will use default percentage values for the injected events. For default Percentage values please check the table at Monkey Test
- *Set TOUCH Event Percentage: Sets the percentage of the number of Touch Events to the whole number of events. This action triggers the reaction of device by touching any point on its screen. Thus, it is possible to test touch based applications on the device. Percentage value must be entered in Parameter (1).
- *Set MOTION Event Percentage: Sets the percentage of the number of Motion Events to the whole number of events. This action triggers the moves on the display screen horizontally and vertically. Percentage value must be entered in Parameter (1).
- *Set TRACKBALL Event Percentage: This action can only be performed if the device has Trackball specificity. Sets the percentage of the number of Trackball Events to the whole number of events. Percentage value must be entered in Parameter (1).
- *Set FLIP Event Percentage: Sets the percentage of the number of Flip Events to the whole number of events. Percentage value must be entered in Parameter (1).
- *Set PINCHZOOM Event Percentage: Sets the percentage of the number of Pinchzoom Events to the whole number of events. Percentage value must be entered in Parameter (1). Pinchzoom describes the actions taken on the screen by using two fingers. For example, in Maps Application zooming in and out and rotating the map can be done using two fingers. Therefore, this action should be tested with available applications such as Maps or Gallery Applications.
- *Set SYSTEM KEYS Event Percentage: Sets the percentage of the number of System Keys Events to the whole number of events. System Keys are used for actions such as adjusting volume level or taking screenshots. Percentage value must be entered in Parameter (1).
- *Set MAJOR NAVIGATION Event Percentage: Sets the percentage of the number of Major Navigation Events to the whole number of events. This action first opens a random application and then starts to test the buttons in the application. For example during a video player application, it starts, stops, pauses, rewinds, forwards etc.. Percentage value must be entered in Parameter (1).
- *Set MINOR NAVIGATION Event Percentage: Sets the percentage of the number of Minor Navigation Events to the whole number of events. This action checks the running application's menu by crossing from one button to another without clicking. Percentage value must be entered in Parameter (1).
- *Set OTHER simple events' percentage: Sets the percentage of the number of Different Events (out of the ones marked with (*) above) to the whole number of events. Percentage value must be entered in Parameter (1).
- *Set application SWITCH events' percentage: Sets the percentage of the number of Switch Events to the whole number of events.
- Reboot Device: Reboots the device. The device turns off and turns on again. It is used to clear the RAM. It takes less time than hard reset. No parameters required.
- Power Off Device: Turns off the device. No parameters required.
- Hard Reset Device with Flash Light: Activates the flashlight to start the machine which is specially designed for this test. The machine senses the flashlight and presses the test device's hard reset button for minimum 16 seconds. Device turns off, then turns on again. When the test is started without the special machine, test device lights up and waits for a while for physical action. If the hard reset button is not pressed, test fails due to Time Out period.
- Set POWER ON alarm minutes to...: Turns on the device which was turned off during the test. The number of minutes needed to turn the device on is entered in Parameter (1). It alarms and triggers the device to turn on at the end of the time entered in Parameter (1). As most Android devices don't respond to the alarm set to less than 5 minuDeğiştirilmediği sürece Zaman Aşımı 3 sn. olarak tanımlanmıştır.tes, we recommend to set the alarm to 7 minutes, before turning it off.
- Play Video with Video Player: The device chooses Video Player for playing video. The path of the video from the computer must be entered in Parameter (1). The Time Out period must be set a couple of seconds more than the duration of the video.
- Play Video with MX Player: The device chooses MX Player for playing video. The path of the video from the computer must be entered in Parameter (1). The Time Out period must be set a couple of seconds more than the duration of the video.
- Use SOFTWARE Decoding in MX Player: Uses the Software Decoder for playing video on MX Player.
- Use HARDWARE Decoding in MX Player: Uses the Hardware Decoder for playing video on MX Player.
- Test All existing Image Wallpapers: Uses only the default wallpapers standing in the device. Sets all the wallpapers one by one. Changing time and test status are recorded.
- Set BOTH wallpaper to ... IMAGE: Sets the image entered in Parameter (1) as wallpaper.
- Set MAIN wallpaper to ... IMAGE: Sets the image entered in Parameter (1) as wallpaper.
- Set LOCK wallpaper to ... IMAGE: Sets the image entered in Parameter (1) as wallpaper.
- Test All existing Live Wallpapers: Uses only the default live wallpapers standing in the device. Sets all the live wallpapers one by one. Changing time and test status are recorded.
- Set wallpaper to ... LIVE Wallpaper: Sets the live wallpaper entered in Parameter (1) as wallpaper.
- Upload IMAGE ... & set as Both Wallpaper: Uploads an image from the computer and sets it as wallpaper. The path of the image must be entered in Parameter (1) by using search button.
- Upload IMAGE ... & set as Main Wallpaper: Uploads an image from the computer and sets it as wallpaper. The path of the image must be entered in Parameter (1) by using search button.
- Upload IMAGE ... & set as Lock Wallpaper: Uploads an image from the computer and sets it as wallpaper. The path of the image must be entered in Parameter (1) by using search button.
- Use image from GALLERY as BOTH Wallpapers: Sets the selected image from device gallery as both wallpapers. The path of the image must be entered in Parameter (1). Selection can be done by clicking the search button.
- Use image from GALLERY as MAIN Wallpaper: Sets the selected image from device gallery as main wallpaper. The path of the image must be entered in Parameter (1). Selection can be done by clicking the search button.
- Use image from GALLERY as LOCK Wallpaper: Sets the selected image from device gallery as lock wallpaper. The path of the image must be entered in Parameter (1). Selection can be done by clicking the search button.
- Test ALL Themes: Sets all the themes existing in the device one by one and checks the performance.
- Set Theme to ...: Sets the theme entered in Parameter (1).
- If Battery Percentage is >= ... GO TO ...: If Battery Percentage is bigger than or equal to the value entered in Parameter (1), the defined scenario continues from the label entered in Parameter (2). This command is used in scenarios which are designed to observe the battery consumption while applications are running or to measure battery charging time under several conditions.
- If Battery Percentage is <= ... GO TO ...: If Battery Percentage is less than or equal to the value entered in Parameter (1), the defined scenario continues from the label entered in Parameter (2). This command is used in scenarios which are designed to observe the battery consumption while applications are running or to measure battery charging time under several conditions.
- Set BlueTooth ON: Sets the Bluetooth On. Bluetooth affects facts like battery usage, device performance and heating.
- Set BlueTooth OFF: Sets the Bluetooth Off. Bluetooth affects facts like battery usage, device performance and heating.
- Pair with the device over Bluetooth: This command pairs the two test devices over Bluetooth.
- Send and Verify ... FILE over Bluetooth: Sends the file which is choosen from the computer to the paired device over Bluetooth. The path of the file must be entered in Parameter (1) and can be picked by using search button. Sender device adds its own Bluetooth Mac adress to the file name. So that, sender and receiver can control they are communicating with correct device. Time Out Period must be set suitable according to the file's size. For example a 100 MB file is sent and received in approximately 20 minutes. If it's short, test fails due to Time Out, but also when it's too long, getting the result may take much longer: it awaits the Maximum Duration Time instead of stopping in case of a problem.
- Send ... VCARD over Bluetooth: Sends a VCARD from contacts list to the paired device over BlueTooth. The path of the VCARD must be entered in Parameter (1) and can be picked by using search button.
- Send ALL contacts over Bluetooth: The device sends all contacts list to the matching device via bluetooth. The content of the contacts list has no significance.
- Set Cellular Data ON: Cellular Data is another option to connect to the internet using GSM line. This command activates the cellular data for a device with an active simcard. Mobile devices can activate cellular data generally in 1 second. The default Time Out value is 3 seconds unless it is changed.
- Set Cellular Data OFF: Inactivates the cellular data. Before using this command, the cellular data must be activated and there must be an active simcard in the device. Mobile devices can inactivate cellular data generally in 1 second. The default Time Out value is 3 seconds unless it is changed.
- Set Network Type to GSM/WCDMA: 3rd Generation Mobile Devices connect to internet on GSM at Edge speed. WCDMA is used for connecting at 3G speed. This action sets the connection as Edge or 3G. The default Time Out value is 10 minutes unless it is changed.
- Set Network Type to WCDMA: Sets the network type as WCDMA. This command increases network quality and data usage. No parameters required. The default Time Out value is 10 minutes unless it is changed.
- Set Network Type to GSM: Sets the network type as GSM. This command decreases network quality and data usage. The connection type is EDGE. No parameters required. The default Time Out value is 10 minutes unless it is changed.
- Set Network Type to GSM/WCDMA/LTE: Sets the network type as GSM / WCDMA / LTE. LTE is in use with 4.5G and is more efficient than 3G and edge. This command activates all these three network types. The device tracks and uses the network type with the best signal quality. No parameters required. The default Time Out value is 10 minutes unless it is changed.
- Set Network Type to LTE: Sets the network type as LTE. No parameters required. The default Time Out value is 10 minutes unless it is changed.
- Set GPS Enabled (On): Enables GPS. GPS is used to locate mobile devices on the world. The location is defined according to three different sattelites' distance calculation. The tolarance may change depending on the device. The performance of GPS is vitally important on applications such as navigation. No parameters required.
- Set GPS Disabled (Off): Disables GPS. No parameters required.
- Set Flight Mode ON: Flight Mode disables communication properties such as mobile and wifi network connections, simcard usage, calls, sms / mms sending and receiving. Device can perform only local applications like camera. No parameters required. The default Time Out value is 3 seconds unless it is changed..
- Set Flight Mode OFF: Sets Flight Mode Off which was set on before. Increases the battery usage. Makes all comminication properties enabled. No parameters required. The default Time Out value is 3 seconds unless it is changed.
- Install ... APK to Devices: Installs the APK adressed in Parameter (1) to the device. Sending installation files to device may take a long time. The memory status of the device can also affect the installation time. The path for the APK can be found from the computer by clicking "search" button.
- Install ... APK to Devices and Start It: Installs and starts the APK adressed in Parameter (1) to the device. Sending installation files to device may take a long time. The memory status of the device can also affect the installation time. The path for the APK can be found from the computer by clicking "search" button.
- Start APPLICATION ...: Starts the application entered in Parameter (1). The application can be found by clicking "search" button.
- Stop APPLICATION ...: Stops the application entered in Parameter (1). The application can be found by clicking "search" button.
- Remove APPLICATION ...: Removes the application entered in Parameter (1). The application can be found by clicking "search" button.
- Open WEB Page ...: Opens the Web Page entered in Parameter (1).
- Add Text to Message ...: Adds the text entered in Parameter (1) to the message. No time out period is required.
- Attach IMAGE to Message ...: Attaches image to the message. The path of the image must be entered to Parameter (1), which can be found by using "Search Button". SMS becomes MMS.
- Attach AUDIO to Message ...: Attaches audio to the message. The path of the audio must be entered to Parameter (1), which can be found by using "Search Button". SMS becomes MMS.
- Attach VIDEO to Message ...: Attaches video to the message. The path of the video must be entered to Parameter (1), which can be found by using "Search Button". SMS becomes MMS.
- Attach VCARD to Message ...: Attaches vcard to the message. The path of the vcard must be entered to Parameter (1), which can be found by using "Search Button". SMS becomes MMS.
- Attach TEXT FILE to Message ...: Attaches text file to the message. The path of the text file must be entered to Parameter (1), which can be found by using "Search Button". SMS becomes MMS.
- Send and Verify from Senders to Receivers: Sends the message and verifies the sent message via the operator. Timout period may change due to facts such as signal quality and operator. If the message is sent to an inactive device, the verifying messages can not be received untill it is activated. No parameters required. At he end of the test, the number of sent and received messages can be calculated with the formula: ((Test Devices-1)x2xTest Devices). *** If 2 simcards from each operators are used in the same test scenario, all possible results can be observed in one test. Time Out value is 5 minutes unless it is changed.
- Limit Senders to Operator ...: Different devices and different operators can be used in sms / mms tests. Allows only the operators entered in Parameter (1) to send messages. Can be used only once in a scenario, that means only one operator can be limited.
- Limit Senders to Device ...: Different devices and different operators can be used in sms / mms tests. Allows only the devices entered in Parameter (1) to send messages. Can be used only once in a scenario, that means only one device model can be limited.
- Limit Receivers to Operator ...: Different devices and different operators can be used in sms / mms tests. Allows only the operator entered in Parameter (1), to recieve messages. Can be used only once in a scenario, that means only one operator can be limited.
- Limit Receivers to Device ...: Different devices and different operators can be used in sms / mms tests. Allows only the devices entered in Parameter (1), to recieve messages. Can be used only once in a scenario, that means only one device model can be limited.
- Send to Phone Number ...: Sends the message to the phone number entered in Parameter (1) and verifies the sent message from the operator. The format of the phone number must be as 05xxxxxxxxx. Phone number of the inserted simcard can be found by dialing *101#. Time Out value is 2 minutes unless it is changed.
- Deliver to Phone Number...: Sends the message to the phone number entered in Parameter (1) and verifies the delivery message from the operator. The format of the phone number must be as 05xxxxxxxxx. Phone number of the inserted simcard can be found by dialing *101#. Time Out value is 4 minutes unless it is changed.
- Select Back Camera(API1): Activates back camera during the camera test. Must be used after "Camera Start Preview" action. Time Out value is 3 seconds unless it is changed.
- Select Front Camera(API1): Activates front camera during the camera test. Must be used after "Camera Start Preview" action. Time Out value is 3 seconds unless it is changed.
- Print Camera Features(API1): Prints Camera Info/Features to the Logs. It contains info like resolution, filters or settings. This action must be completed before the "Camera Start Preview" command.
- Set Camera Picture Size(API1): It asks the user for the size of the photo that will be taken. The information must be entered in "1024x768" format. Since Resolution varies with the camera hardware, this resolution info must be selected from "Print Camera Info/ picture-size-values" list.
- Camera Start Preview: Starts Camera Preview. It is necessary for taking pictures.
- Camera Stop preview: Stops Camera Preview. With this command camera preview will not continue working at the background.
- Camera Take Picture: Takes Picture. It must be used after "Camera Start Preview" action.
- Start- Camera VIDEO Recording (API1): Starts shooting video using the selected camera. It should be used after determining the area to save (Saved Area).
- Stop - Camera VIDEO Recording (API1): Stops shooting video using the selected camera. It should be used after the command Start - camera video recording.
- Set Camera Contrast(API1): This action is used to adjust contrast between the colors on the screen. Contrast value should be between 0-10. The default value is taken as 5.
- Set Camera Saturation(API1): Used to define color intensity of the photo. Saturated color should look deep, rich and live. Saturation value should be between 0 - 10. The default value is taken as 5.
- Enable GPS data in the Photo (API1): Adds GPS latitude, longitude, altitude, and timestamp of the photo, to the photo information parameters. It records photo's latitude - longitude or address using the relevant features of the device.
- Disable GPS data in Photo(API1): Removes the addition of GPS latitude, longitude, altitude, and timestamp of the photo, to the photo information parameters.
- Enable Camera TOUCH Focus (API1): Used to focus on any point on the screen.
- Disable Camera TOUCH Focus (API1): Enables focusing automatically.
- Enable Camera FACE Detection (API1): Starts the face detection. It automatically focuses on the faces of the people on the frame. This command should be called after the preview is on.
- Disable Camera FACE Detection(API1): Stops the face detection. This should be called after preview is started.
- Set Camera Flash Mode OFF (API1): Flash will not be fired regardless of the intensity of light.
- Set Camera Flash Mode ON(API1): Flash will always be fired during snapshot. Flash may also be fired during preview depending on the driver features.
- Set Camera Flash Mode AUTO (API1): Flash will be fired automatically depending on the intensity of light. For example, when there is not enough light it will be fired and when light is sufficient it won't.
- Set Camera Flash Mode RED EYE (API1): Flash will be fired in red-eye reduction mode. Before taking the photo, the flash should be shot several times.
- Set Camera Flash Mode TORCH (API1): Constant emission of light during preview, auto-focus and snapshot. This can also be used for video recording.
- Set Camera Antibanding OFF (API1): This option is used to prevent vibration while shooting photos. In the closed position, the camerais affected by vibration during photo shoot.
- Set Camera Antibanding AUTO(API1): Anti banding value is set automatically. Thus photograps are taken more clearly.
- Set Camera Antibanding 50Hz (API1): It sets antibanding value to 50 Hz. This should be used for devices manufactured in Europe and Turkey.
- Set Camera Antibanding 60Hz (API1): It sets antibanding value to 60 Hz. This should be used for devices manufactured in USA and Japan.
- Set Camera White Balance AUTO(API1): Default WB setting. The camera automatically determines the WB depending on the ambient light.
- Set Camera White Balance DAYLIGHT(API1): Used when shooting outdoors with the sun lighting the ambient.
- Set Camera WhiteBalance CLOUDY DAYLIGHT (API1): Used when shooting on cloudy days or in shades. It Will yield warmer images than sunlight.
- Set Camera WhiteBalance FLUORESCENT (API1): Use if photos look too green or when under fluorescent lights.
- Set Camera WhiteBalance WARM FLUORESCENT (API1):Use if photos look too green or when under warm fluorescent lights.
- Set Camera WhiteBalance INCANDESCENT (API1): This type of lighting is gradually being phased out. If you are shooting under incandescent light, your images may be objectionably warm, with orange skin tones and whites that are not white.
- Set Camera WhiteBalance SHADE (API1): Light in the shade is very blue, primarily because the warm light of the sun is not shining on the subject.
- Set Camera WhiteBalance TWILIGHT (API1): Used in twilight times - i.e evening and before sunrise.
- Set Camera Scene Mode AUTO (API1): Analyzes the type of scene and shooting conditions and automatically selects the scene mode.
- Set Camera Scene Mode ACTION(API1): It takes photos of a fast moving subject; fast shutter speeds freeze the action. For best solution, taking photos bright light and pre-focusing recommended.
- Set Camera Scene Mode BARCODE (API1): This mode is used to capture barcode or QR-code.
- Set Camera Scene Mode BEACH (API1): The photograph scene is beach scene. Exposure and white balance are set to help prevent the scene from becoming washed out looking.
- Set Camera Scene Mode CANDLELIGHT (API1): This mode is a variation of Night portrait, but usually without flash in order to preserve the ambiance of light. Captures the naturally warm color of scenes lit by candles.
- Set Camera Scene Mode FIREWORKS (API1): This mode is a variation of night landscape, but with a slower shutter speed to catch the trails of fireworks.
- Set Camera Scene Mode HDR (API1): Capture a scene using high dynamic range imaging techniques - i.e taking several shoots of the same setting and capturing the best outcome by overlapping the shoots.
- Set Camera Scene Mode LANDSCAPE (API1): This mode attempts to get as much of the scene in focus as possible, and will occasionally boost saturation on greens, blues, and reds to render photos that "pop."
- Set Camera Scene Mode NIGHT (API1): This mode is designed for shooting photos in low light, preserving detail in the dark areas without blowing out bright objects, like streetlights.
- Set Camera Scene Mode NIGHT PORTRAIT (API1): Take photos of a subject against a night scene. The built-in flash and red-eye reduction are enabled; shutter-speeds are low. Use of tripod recommended.
- Set Camera Scene Mode PARTY (API1): Take photos in a dim lit room; exposure and shutter speed are automatically adjusted for room brightness. Captures indoor background lighting or candlelight. Hold the camera very steady when using this mode.
- Set Camera Scene Mode PORTRAIT (API1): The goal is usually to render the face(s) in focus against a blurred background.
- Set Camera Scene Mode SNOW (API1): Snow mode might also adjust the white balance to compensate for the fact that reflected snow looks bluish rather than white.
- Set Camera Scene Mode SPORTS (API1): This mode usually attempts to freeze fast-moving subjects.
- Set Camera Scene Mode STEADYPHOTO (API1): This mode usually attempts to freeze stationary subjects.
- Set Camera Scene Mode SUNSET (API1): This mode takes photos of sunsets and sunrises; and helps keep the deep hues in the scene.
- Set Camera Scene Mode THEATRE (API1): This mode is optimized for indoor shooting without flash.
- Camera - SAVE to SDCARD (API1): Saves the pictures in SD Card.
- Camera - SAVE to internal Gallery (API1): Saves the pictures in internal Gallery.
- Select Back Camera(API2): Activates back camera during the camera test. Must be used after "Camera Start Preview" action. Time Out value is 3 seconds unless it is changed.
- Select Front Camera(API2): Activates front camera during the camera test. Must be used after "Camera Start Preview" action. Time Out value is 3 seconds unless it is changed.
- Print Camera Features: Prints Camera Info/Features to the Logs. It contains info like resolution, filters or settings. This action must be completed before the "Camera Start Preview" command.
- Start Camera Preview (API2): Starts Camera Preview. It is necessary for taking pictures.
- Stop Camera Preview (API2): Stops Camera Preview. With this command camera preview will not continue working at the background.
- Camera Take Picture(API2): Takes Picture. It must be used after "Camera Start Preview" action.
- Enable GPS data in Picture (API2): Adds GPS latitude, longitude, altitude, and timestamp of the photo, to the photo information parameters. It records photo's latitude - longitude or address using the relevant features of the device.
- Disable GPS data in Picture(API2): Removes the addition of GPS latitude, longitude, altitude, and timestamp of the photo, to the photo information parameters.
- Set Camera Flash Mode OFF (API2): Flash will not be fired regardless of the intensity of light.
- Set Camera Flash Mode ON(API2): Flash will always be fired during snapshot. Flash may also be fired during preview depending on the driver features.
- Set Camera Flash Mode AUTO (API2): Flash will be fired automatically depending on the intensity of light. For example, when there is not enough light it will be fired and when light is sufficient it won't.
- Set Camera Flash Mode RED EYE (API2): Flash will be fired in red-eye reduction mode. Before taking the photo, the flash should be shot several times.
- Set Camera Flash Mode TORCH (API2):Constant emission of light during preview, auto-focus and snapshot. This can also be used for video recording.
- Set Camera Antibanding OFF (API2): This option is used to prevent vibration while shooting photos. In the closed position, the camerais affected by vibration during photo shoot.
- Set Camera Antibanding AUTO(API2): Anti banding value is set automatically. Thus photograps are taken more clearly.
- Set Camera Antibanding 50Hz (API2):It sets antibanding value to 50 Hz. This should be used for devices manufactured in Europe and Turkey.
- Set Camera Antibanding 60Hz (API2): It sets antibanding value to 60 Hz. This should be used for devices manufactured in USA and Japan.
- Set Camera White Balance AUTO(API2): Default WB setting. The camera automatically determines the WB depending on the ambient light.
- Set Camera White Balance DAYLIGHT(API2):Used when shooting outdoors with the sun lighting the ambient.
- Set Camera WhiteBalance CLOUDY DAYLIGHT (API2): Used when shooting on cloudy days or in shades. It Will yield warmer images than sunlight.
- Set Camera WhiteBalance FLUORESCENT (API2): Use if photos look too green or when under fluorescent lights.
- Set Camera WhiteBalance WARM FLUORESCENT (API2):Use if photos look too green or when under warm fluorescent lights.
- Set Camera WhiteBalance INCANDESCENT (API2): This type of lighting is gradually being phased out. If you are shooting under incandescent light, your images may be objectionably warm, with orange skin tones and whites that are not white.
- Set Camera WhiteBalance SHADE (API2): Light in the shade is very blue, primarily because the warm light of the sun is not shining on the subject.
- Set Camera WhiteBalance TWILIGHT (API2): Used in twilight times - i.e evening and before sunrise.
- Set Camera Scene Mode AUTO (API2):Analyzes the type of scene and shooting conditions and automatically selects the scene mode.
- Set Camera Scene Mode ACTION(API2):It takes photos of a fast moving subject; fast shutter speeds freeze the action. For best solution, taking photos bright light and pre-focusing recommended.
- Set Camera Scene Mode BARCODE (API2): This mode is used to capture barcode or QR-code.
- Set Camera Scene Mode BEACH (API2): The photograph scene is beach scene. Exposure and white balance are set to help prevent the scene from becoming washed out looking.
- Set Camera Scene Mode CANDLELIGHT (API2): This mode is a variation of Night portrait, but usually without flash in order to preserve the ambiance of light. Captures the naturally warm color of scenes lit by candles.
- Set Camera Scene Mode FIREWORKS (API2): This mode is a variation of night landscape, but with a slower shutter speed to catch the trails of fireworks.
- Set Camera Scene Mode HDR (API2): Capture a scene using high dynamic range imaging techniques - i.e taking several shoots of the same setting and capturing the best outcome by overlapping the shoots.
- Set Camera Scene Mode LANDSCAPE (API2): This mode attempts to get as much of the scene in focus as possible, and will occasionally boost saturation on greens, blues, and reds to render photos that "pop."
- Set Camera Scene Mode NIGHT (API2): This mode is designed for shooting photos in low light, preserving detail in the dark areas without blowing out bright objects, like streetlights.
- Set Camera Scene Mode NIGHT PORTRAIT (API2): Take photos of a subject against a night scene. The built-in flash and red-eye reduction are enabled; shutter-speeds are low. Use of tripod recommended.
- Set Camera Scene Mode PARTY (API2): Take photos in a dim lit room; exposure and shutter speed are automatically adjusted for room brightness. Captures indoor background lighting or candlelight. Hold the camera very steady when using this mode.
- Set Camera Scene Mode PORTRAIT (API2): The goal is usually to render the face(s) in focus against a blurred background.
- Set Camera Scene Mode SNOW (API2): Snow mode might also adjust the white balance to compensate for the fact that reflected snow looks bluish rather than white.
- Set Camera Scene Mode SPORTS (API2): This mode usually attempts to freeze fast-moving subjects.
- Set Camera Scene Mode STEADYPHOTO (API2): This mode usually attempts to freeze stationary subjects.
- Set Camera Scene Mode SUNSET (API2): This mode takes photos of sunsets and sunrises; and helps keep the deep hues in the scene.
- Set Camera Scene Mode THEATRE (API2): This mode is optimized for indoor shooting without flash.
- Set Camera Picture Size(API2): It asks the user for the size of the photo that will be taken. The information must be entered in "1024x768" format. Since Resolution varies with the camera hardware, this resolution info must be selected from "Print Camera Info/ picture-size-values" list.
- Camera - SAVE to SDCARD (API2): Saves the pictures in SD Card.
- Camera - SAVE to Internal Gallery (API2): Saves the pictures in internal Gallery.
- Camera - Start VIDEO Recording (API2): Starts shooting video using the selected camera. It should be used after determining the area to save (Saved Area).
- Camera - Stop VIDEO Recording (API2): Stops shooting video using the selected camera. It should be used after the command Start - camera video recording.
- Install Aplication from GooglePlay: Downloads and installs the APK entered in Parameter (1). After entering at least 3 letters, with search button, a new window, containing the whole list of related APKs in Google Play, will appear on the screen.
- Test LIGHT Sensor: Checks if the light sensor is working or not. For detailed information about the sensors, please visit: Android Sensors
- Test ACCELEROMETER Sensor: Checks if the accelerometer sensor is working or not. For detailed information about the sensors, please visit: Android Sensors
- Test GPS Sensor: Checks if the GPS sensor is working or not. For detailed information about the sensors, please visit: Android Sensors
- Test ORIENTATION Sensor: Checks if the orientation sensor is working or not. For detailed information about the sensors, please visit: Android Sensors
- Test PROXIMITY Sensor: Checks if the proximity sensor is working or not. For detailed information about the sensors, please visit: Android Sensors
- Test GYROSCOPE Sensor: Checks if the gyroscope sensor is working or not. For detailed information about the sensors, please visit: Android Sensors
- Test SOUND Sensor: Checks if the sound sensor is working or not. For detailed information about the sensors, please visit: Android Sensors
- Test MAGNETIC Sensor: Checks if the magnetic sensor is working or not. For detailed information about the sensors, please visit: Android Sensors
- Test HALL Sensor: Checks if the hall sensor is working or not. For detailed information about the sensors, please visit: Android Sensors
- Set E-Mail Account (abc@def.com) : Sets the account which is entered in Parameter(1) to work on for the test.
- Set E-Mail Password: The password of the account to be worked on must be entered in Paremeter(1).
- Set Server Type to POP3: Sets the server type for e-mailing to POP3.
- Set Server Type to IMAP: Sets the server type for e-mailing to IMAP.
- Set Server Type to EXCHANGE: Sets the server type for e-mailing to Windows Exchange.
- Set Incoming SERVER to ...: Incoming server's name must be entered in Parameter(1). It may be as "pop.abc.com" for POP3 type accounts and may be as "mail.abc.com" for IMAP type accounts.
- Set Incoming PORT to ...: Correct port of the incoming server must be entered in Parameter(1). Usually the values:
- For POP3: 995 / 110
- For IMAP: 993 / 143
- For Exchange Server: 135, are used. They may be changed for different purposes. If the entered value is incorrect test fails.
- Set Incoming SECURITY to SSL/TLS: Sets incoming Security to SSL/TLS. It's an option used to encrypt e-mails for safety.
- Set Incoming SECURITY to SSL/TLS(trust all certs): Sets incoming Security to SSL/TLS(trust all certs). It's an option used to encrypt e-mails for safety. Yet, trusts all certs and allows e-mailing at the minimum safety level.
- Set Incoming SECURITY to STARTTLS: Sets incoming Security to STARTTLS. It's an option used to encrypt e-mails for safety.
- Set Incoming SECURITY to STARTTLS(trust all certs): Sets incoming Security to STARTTLS(trust all certs). It's an option used to encrypt e-mails for safety. Yet, trusts all certs and allows e-mailing at the minimum safety level.
- Set Outgoing SERVER to ...: Outgoing server's name must be entered in Parameter(1). It may be as "pop.abc.com" for POP3 type accounts and may be as "mail.abc.com" for IMAP type accounts.
- Set Outgoing PORT to ...: Correct port of the incoming server must be entered in Parameter(1). Usually the values:
- For POP3: 465 / 587 / 25
- For IMAP: 465 / 587 / 25, are used. They may be changed for different purposes. If the entered value is incorrect test fails.
- Set Outgoing SECURITY to SSL/TLS: Sets outgoing Security to SSL/TLS. It's an option used to encrypt e-mails for safety.
- Set Outgoing SECURITY to SSL/TLS(trust all certs): Sets outgoing Security to SSL/TLS(trust all certs). It's an option used to encrypt e-mails for safety. Yet, trusts all certs and allows e-mailing at the minimum safety level.
- Set Outgoing SECURITY to STARTTLS: Sets outgoing Security to STARTTLS. It's an option used to encrypt e-mails for safety.
- Set Outgoing SECURITY to STARTTLS(trust all certs): Sets outgoing Security to STARTTLS(trust all certs). It's an option used to encrypt e-mails for safety. Yet, trusts all certs and allows e-mailing at the minimum safety level.
- ADD E-Mail Account: Adds the E-mail account to the application whose information was given at previous steps of the scenario. The information of the account and the seqence of actions must be entered correctly. Otherwise the account can not be created and test fails. The default Time Out value is 2 minutes unless it is changed.
- ADD E-Mail Account(AUTO): Adds the E-mail account to the application whose information was given at previous steps of the scenario automatically. The information of the account and the seqence of actions must be entered correctly. Otherwise the account can not be created and test fails. The default Time Out value is 2 minutes unless it is changed.
- Remove E-Mail Account: Deletes the E-mail account from the application which is entered in Parameter(1). The default Time Out value is 1 minute unless it is changed.
- Add E-mail RECEPIENT: Adds the E-mail account which is entered in Parameter(1) as receipent. The default Time Out value is 1 minute unless it is changed.
- Set E-mail SUBJECT : Sets the text that's entered in Parameter(1) as E-mail subject. The default Time Out value is 1 minute unless it is changed.
- Add to BODY ...: Adds the content that's entered in Parameter(1) to the E-mail body. The default Time Out value is 1 minute unless it is changed.
- Add ATTACHMENT ... to E-Mail: Adds the file whose path is entered in Parameter(1) as an attachment to the E-mail. The path of the file from the computer can be found by using search button. The default Time Out value is 1 minute unless it is changed.
- Send E-MAIL: Sends the E-MAIL which is prepared at previous steps. The default Time Out value is 1 minute unless it is changed.
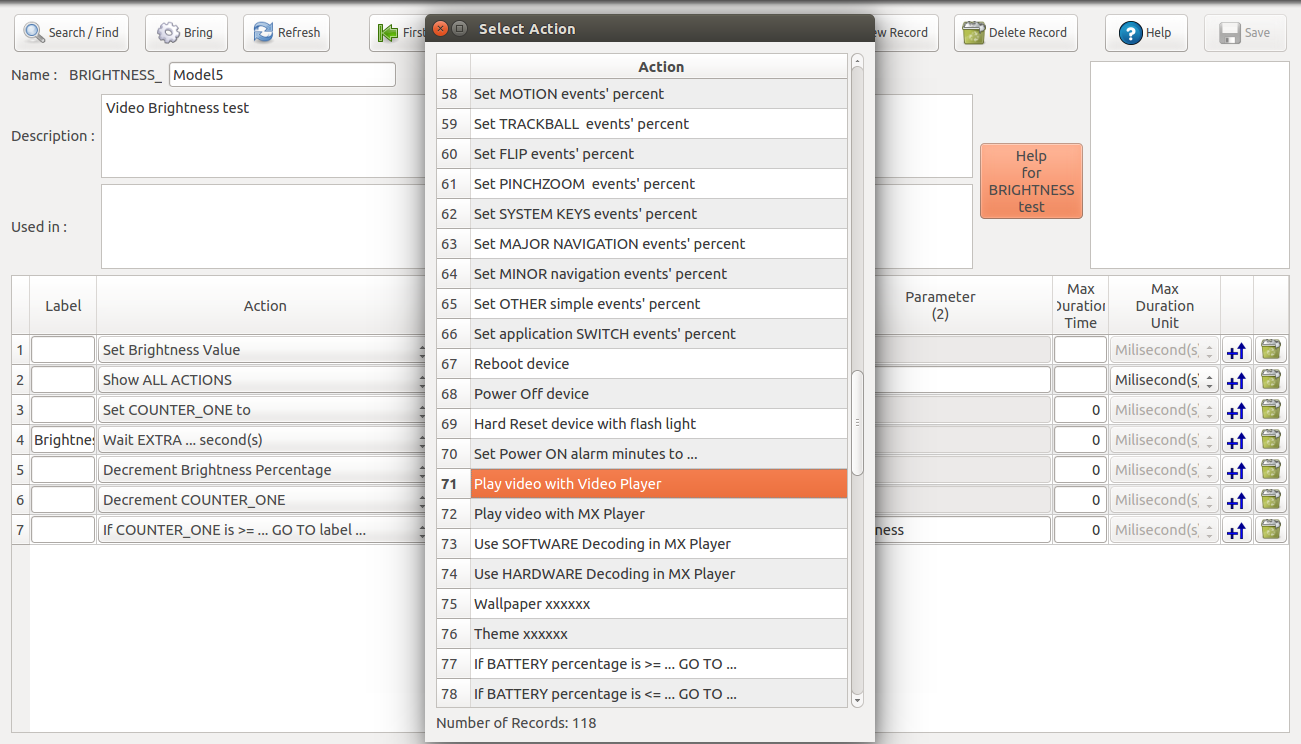
On below example, at the second step, "Show All Actions" is used to add a video to Brightness Test.
Below, you can see a combined test example. The scenario is for testing changeover performance between different applications on defined conditions. In the mean time, battery usage and the signal quality are measured and recorded.

In this test:
- Wifi will be enabled,
- Connection to xxx wifi network with yyy passsword will be established,
- Screen brightness will be set to 70% level,
- Screen orientation will be set to landscape position,
- System Volume Percentage will be set to 50%,
- Hardware decoder will be used in MX Player,
- Chosen Video will be played with MX Player,
- Battery info will be recorded,
- Bluetooth will be activated,
- Entered text will be added to message,
- The message will be sent to defined number,
- Test will be finished.