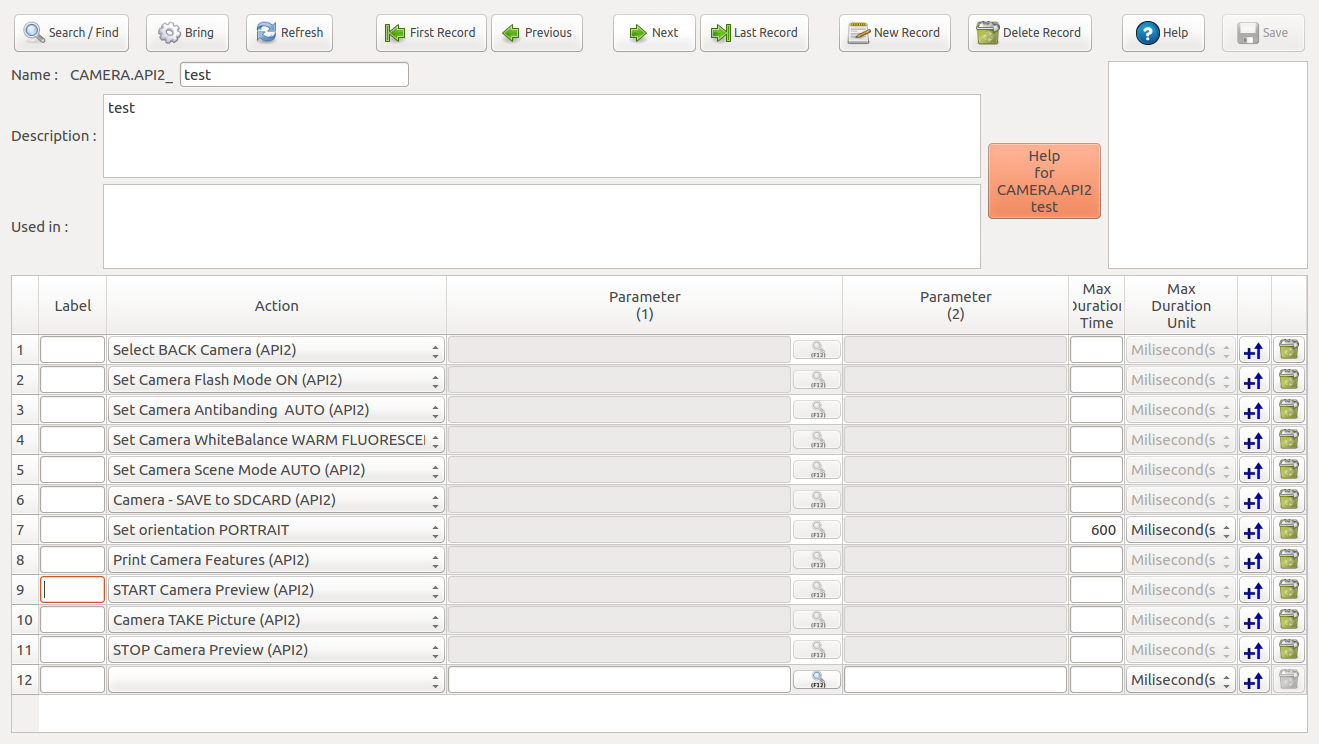
Camera Test (API 2)
Camera test is prepared to test the performance of the front and back cameras. The test allows the testing of features like repeated shots, changing modes and zooming. Test name should be in English Alphabet characters. Additionally, the camera preview must be activated firstly to take pictures.
This API developed for Android Lollipop and after versions. It is only can be used android versions 5.0+.
The main actions are as follows:
- Select Back Camera: Activates back camera during the camera test. Must be used after "Camera Start Preview" action. Time Out value is 3 seconds unless it is changed.
- Select Front Camera: Activates front camera during the camera test. Must be used after "Camera Start Preview" action. Time Out value is 3 seconds unless it is changed.
- Print Camera Features: Prints Camera Info/Features to the Logs. It contains info like resolution, filters or settings. This action must be completed before the "Camera Start Preview" command.
- Set Camera Picture Size(API2): It asks the user for the size of the photo that will be taken. The information must be entered in "1024x768" format. Since Resolution varies with the camera hardware, this resolution info must be selected from "Print Camera Info/ picture-size-values" list.
- Camera Start Preview (API2): Starts Camera Preview. It is necessary for taking pictures.
- Camera Stop Preview (API2): Stops Camera Preview. With this command camera preview will not continue working at the background.
- Camera Take Picture: Takes Picture. It must be used after "Camera Start Preview" action.
- Camera - Start VIDEO Recording (API2): Starts shooting video using the selected camera. It should be used after determining the area to save (Saved Area).
- Camera - Stop VIDEO Recording (API2): Stops shooting video using the selected camera. It should be used after the command Start - camera video recording.
- Enable GPS data in Picture (API2): Adds GPS latitude, longitude, altitude, and timestamp of the photo, to the photo information parameters. It records photo's latitude - longitude or address using the relevant features of the device.
- Disable GPS data in Picture(API2): Removes the addition of GPS latitude, longitude, altitude, and timestamp of the photo, to the photo information parameters.
- Enable Camera TOUCH Focus (API2): Used to focus on any point on the screen.
- Disable Camera TOUCH Focus (API2): Enables focusing automatically.
- Set Camera Flash Mode OFF (API2): Flash will not be fired regardless of the intensity of light.
- Set Camera Flash Mode ON(API2): Flash will always be fired during snapshot. Flash may also be fired during preview depending on the driver features.
- Set Camera Flash Mode AUTO (API2): Flash will be fired automatically depending on the intensity of light. For example, when there is not enough light it will be fired and when light is sufficient it won't.
- Set Camera Flash Mode RED EYE (API2): Flash will be fired in red-eye reduction mode. Before taking the photo, the flash should be shot several times.
- Set Camera Flash Mode TORCH (API2): Constant emission of light during preview, auto-focus and snapshot. This can also be used for video recording.
- Set Camera Antibanding OFF (API2): This option is used to prevent vibration while shooting photos. In the closed position, the camerais affected by vibration during photo shoot.
- Set Camera Antibanding AUTO(API2): Anti banding value is set automatically. Thus photographs are taken more clearly.
- Set Camera Antibanding 50Hz (API2): It sets antibanding value to 50 Hz. This should be used for devices manufactured in Europe and Turkey.
- Set Camera Antibanding 60Hz (API2): It sets antibanding value to 60 Hz. This should be used for devices manufactured in USA and Japan.
- Set Camera White Balance AUTO(API2): Default WB setting. The camera automatically determines the WB depending on the ambient light.
- Set Camera White Balance DAYLIGHT(API2): Used when shooting outdoors with the sun lighting the ambient.
- Set Camera WhiteBalance CLOUDY DAYLIGHT (API2): Used when shooting on cloudy days or in shades. It Will yield warmer images than sunlight.
- Set Camera WhiteBalance FLUORESCENT (API2): Use if photos look too green or when under fluorescent lights.
- Set Camera WhiteBalance WARM FLUORESCENT (API2): Use if photos look too green or when under warm fluorescent lights.
- Set Camera WhiteBalance INCANDESCENT (API2): This type of lighting is gradually being phased out. If you are shooting under incandescent light, your images may be objectionably warm, with orange skin tones and whites that are not white.
- Set Camera WhiteBalance SHADE (API2): Light in the shade is very blue, primarily because the warm light of the sun is not shining on the subject.
- Set Camera WhiteBalance TWILIGHT (API2): Used in twilight times - i.e evening and before sunrise.
- Set Camera Scene Mode AUTO (API2): Analyzes the type of scene and shooting conditions and automatically selects the scene mode.
- Set Camera Scene Mode ACTION(API2): It takes photos of a fast moving subject; fast shutter speeds freeze the action. For best solution, taking photos bright light and pre-focusing recommended.
- Set Camera Scene Mode BARCODE (API2): This mode is used to capture barcode or QR-code.
- Set Camera Scene Mode BEACH (API2): The photograph scene is beach scene. Exposure and white balance are set to help prevent the scene from becoming washed out looking.
- Set Camera Scene Mode CANDLELIGHT (API2): This mode is a variation of Night portrait, but usually without flash in order to preserve the ambiance of light. Captures the naturally warm color of scenes lit by candles.
- Set Camera Scene Mode FIREWORKS (API2): This mode is a variation of night landscape, but with a slower shutter speed to catch the trails of fireworks.
- Set Camera Scene Mode HDR (API2): Capture a scene using high dynamic range imaging techniques - i.e taking several shoots of the same setting and capturing the best outcome by overlapping the shoots.
- Set Camera Scene Mode LANDSCAPE (API2): This mode attempts to get as much of the scene in focus as possible, and will occasionally boost saturation on greens, blues, and reds to render photos that "pop."
- Set Camera Scene Mode NIGHT (API2): This mode is designed for shooting photos in low light, preserving detail in the dark areas without blowing out bright objects, like streetlights.
- Set Camera Scene Mode NIGHT PORTRAIT (API2): Take photos of a subject against a night scene. The built-in flash and red-eye reduction are enabled; shutter-speeds are low. Use of tripod recommended.
- Set Camera Scene Mode PARTY (API2): Take photos in a dim lit room; exposure and shutter speed are automatically adjusted for room brightness. Captures indoor background lighting or candlelight. Hold the camera very steady when using this mode.
- Set Camera Scene Mode PORTRAIT (API2): The goal is usually to render the face(s) in focus against a blurred background.
- Set Camera Scene Mode SNOW (API2): Snow mode might also adjust the white balance to compensate for the fact that reflected snow looks bluish rather than white.
- Set Camera Scene Mode SPORTS (API2): This mode usually attempts to freeze fast-moving subjects.
- Set Camera Scene Mode STEADYPHOTO (API2): This mode usually attempts to freeze stationary subjects.
- Set Camera Scene Mode SUNSET (API2): This mode takes photos of sunsets and sunrises; and helps keep the deep hues in the scene.
- Set Camera Scene Mode THEATRE (API2): This mode is optimized for indoor shooting without flash.
- Camera - SAVE to SDCARD (API2): Saves the pictures in SD Card.
- Camera - SAVE to Internal Gallery (API2): Saves the pictures in internal Gallery.
- Set orientation Portrait: Sets the screen rotation to portrtait. All touchscreen devices can be rotated 360 degrees. No parameters required. Default Time Out period is 600 ms unless it is changed.
- Set Orientation Landscape: Sets the screen rotation to landscape with a 90° angle to portrait orientation. This option is generally used while playing games and watching videos. No parameters required. Default Time Out period is 600 ms unless it is changed.
- Wait Extra ... Second(s): Waits extra amount of seconds entered in Parameter (1) before taking the next step of the test.
- Wait Extra ... Minute(s): Waits extra amount of minutes entered in Parameter (1) before taking the next step of the test.
- Show All Actions: This button stands at the bottom of the Action List. It opens a new window where all test actions can be seen together. This option allows us to use all actions in any scenario.